
2015-10-27 - Nº 26

Editorial
Aqui está a Newsletter Nº 26 no seu formato habitual. Foram adicionados botões de partilha nas várias redes sociais, se gostar da Newsletter partilhe-a!
Todas as Newsletters encontram-se indexadas no link.
Esta Newsletter tem os seguintes tópicos:
Hoje temos mais uma super Lua, a ultima de 2015. No dia das bruxas irá passar muito próximo da Terra um Asteróide designado por 2015 TB145. A Atmel vai lançar o primeiro MCU megaAVR para missões espaciais. Cientistas conseguiram com um implante dar mobilidade no braço e mão a um homem que se encontra paralisado. A Western Digital vai comprar a SanDisk. Na Newsletter desta semana iremos apresentar um projeto de maker que é um RGB Internet Pumpkin. Iremos construir um circuito para que se possa fazer o shutdown do Raspberry Pi com um botão.
 João Alves ([email protected])
O conteúdo da Newsletter encontra-se sob a licença  Creative Commons Attribution-NonCommercial-ShareAlike 4.0 International License.
Novidades da Semana ^
O céu noturno em outubro de 2015 - A Super Lua de outubro

"A última Super Lua de 2015 ocorrerá na terça-feira dia 27, quando a Lua se encontra simultaneamente em fase de Lua Cheia e a uma distância da Terra inferior a 110% do perigeu da sua órbita. Na segunda-feira dia 26 às 13h01 (hora de Lisboa) a Lua atingirá o perigeu (a 358463 quilómetros da Terra), e estará em fase de Lua Cheia na terça-feira dia 27 às 12h06, estando os 2 acontecimentos apenas desfasados entre si de 23h05min. No dia 27 a Lua nasce às 18h03. Nessa altura, a Lua vai parecer maior do que o habitual, não apenas devido à ocorrência de Super Lua, mas também porque estando próxima do horizonte vê-se mais ampliada, o que é apenas uma ilusão de óptica. No dia seguinte, dia 28, a Lua nasce às 18h49 e continuará a parecer maior do que o habitual."
Unexpected Asteroid to Zip Past Earth On Halloween

"We can expect a totally different kind of trick-or-treater this coming Halloween. A rather large asteroid—discovered less than three weeks ago—is set to to fly past the Earth at a distance not seen in nearly a decade. The asteroid, dubbed 2015 TB145, was discovered on October 10 by astronomers using the Pan-STARRS telescope. The object measures about 280 to 620 meters (920 to 2,034 feet) in diameter, so it’s pretty big—about the size of a skyscraper. Or two. Not only that, it’s moving at a velocity of 35 km/s (78,830 mph or 12,600 km/h), which NASA describes as “unusually high.”"
Atmel Launches First Rad Tolerant megaAVR MCU for Space Applications

"(...) announced it is shipping the Atmel ATmegaS128 MCU targeting next-generation space applications. In addition to all the popular features of the megaAVR® family, the new ATmegaS128--the first uC Rad Tolerant device for Atmel--delivers full wafer lot traceability, 64-lead ceramic package (CQFP), space screening, space qualification according to QML and ESCC flow and total ionizing dose up to 30 Krad (Si) for space applications. The ATMegaS128 is "latch up" immune thanks to a dedicated silicon process: SEL LET > 62.5Mev at 125°C, 8MHz/3.3V. SEU to heavy ions is estimated to 10-3 error/device/day for Low Earth Orbit applications. With billions of commercial AVR devices widely deployed throughout the world, the new space-grade AVR family benefits from support of the Atmel Studio ecosystem and allows aerospace developers to use the industrial-version of the ATmega AVR to prototype their applications for a fraction of the cost. The ATmegaS128 is available in a ceramic hermetic packaging and is pin-to-pin and drop-in compatible with existing ATmega128 MCUs, allowing flexibility between commercial and qualified devices, enabling faster-time-to-market and minimizing development costs. With this cost-effective approach and a plastic Hirel-qualified version, the ATmegaS128 can be also considered in more general aerospace applications including class A and B avionic critical cases where radiation tolerance is also a key requirement."
Paralyzed Man’s Arm Wired to Receive Brain Signals

"Scientists at Case Western Reserve University in Ohio say they’ve used electronics to get around a paralyzed man’s spinal injury, permitting him to use an implant in his brain to move his arm and hand. The test represents the first time that signals collected in the brain have been conveyed directly to electrodes placed inside someone’s arm to restore movement, says Robert Kirsch, a biomedical engineer at Case Western. He also directs the Cleveland FES Center, which develops technologies for people with paralysis. The project, described today at the meeting of the Society for Neuroscience in Chicago, is a step toward a wireless system able to transmit brain signals through the air to electronics sewn into the limbs of paralyzed people, thereby restoring the ability to carry out simple daily tasks."
Western Digital Announces Acquisition Of SanDisk

"Western Digital® Corporation (NASDAQ: WDC) and SanDisk Corporation (NASDAQ: SNDK) today announced that they have entered into a definitive agreement under which Western Digital will acquire all of the outstanding shares of SanDisk for a combination of cash and stock. The offer values SanDisk common stock at $86.50 per share or a total equity value of approximately $19 billion, using a five-day volume weighted average price ending on October 20, 2015 of $79.60 per share of Western Digital common stock. If the previously announced investment in Western Digital by Unisplendour Corporation Limited closes prior to this acquisition, Western Digital will pay $85.10 per share in cash and 0.0176 shares of Western Digital common stock per share of SanDisk common stock; and if the Unisplendour transaction has not closed or has been terminated, $67.50 in cash and 0.2387 shares of Western Digital common stock per share of SanDisk common stock. The transaction has been approved by the boards of directors of both companies. The combination is the next step in the transformation of Western Digital into a storage solutions company with global scale, extensive product and technology assets, and deep expertise in non-volatile memory (NVM). With this transaction, Western Digital will double its addressable market and expand its participation in higher-growth segments. SanDisk brings a 27-year history of innovation and expertise in NVM, systems solutions and manufacturing. The combination also enables Western Digital to vertically integrate into NAND, securing long-term access to solid state technology at lower cost."
Ciência e Tecnologia ^
Vanishing Acts: A Call for Disappearing Delivery Vehicles

"It sounds like an engineering fantasy, or maybe an episode from Mission Impossible: A flock of small, single-use, unpowered delivery vehicles dropped from an aircraft, each of which literally vanishes after landing and delivering food or medical supplies to an isolated village during an epidemic or disaster. And it would be nothing more than a fantasy, were it not that the principle behind disappearing materials has already been proven. Building on recent innovations in its two-year-old Vanishing Programmable Resources (VAPR) program, which has developed self-destructing electronic components, DARPA today launched ICARUS, a program driven by a vision of vanishing air vehicles that can make precise deliveries of critical supplies and then vaporize into thin air."
A fast cell sorter shrinks to cell phone size

"Commercially available cell sorters can rapidly and accurately aid medical diagnosis and biological research, but they are large and expensive, present a biohazard and may damage cells. Now a team of researchers has developed a cell sorter based on acoustic waves that can compete with existing fluorescence-activated cell sorters and is an inexpensive lab on a chip."
Light-based memory chip is the first ever to store data permanently

"The world’s first entirely light-based memory chip to store data permanently has been developed by material scientists at Oxford University and University of Münster in collaboration with scientists at Karlsruhe and Exeter. The device, which makes use of materials used in CDs and DVDs, could help dramatically improve the speed of modern computing. Today’s computers are held back by the relatively slow transmission of electronic data between the processor and the memory. ‘There’s no point using faster processors if the limiting factor is the shuttling of information to-and-from the memory — the so-called von-Neumann bottleneck,’ explains Professor Harish Bhaskaran, the Oxford engineer who led the research along with Professor Wolfram Pernice from the University of Münster. ‘But we think using light can significantly speed this up.’"
Modelos 3D ^
Com a disponibilidade de ferramentas que permitem dar azo a nossa imaginação na criação de peças 3D e espaços como o thingiverse para as publicar, esta rubrica apresenta alguns modelos selecionados que poderão ser úteis.
Chip Clip 28 (http://www.thingiverse.com/thing:1088309)
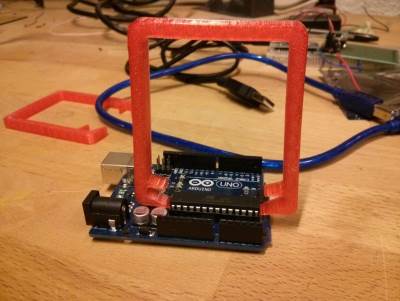
Chip Clip for easy extracting of chips from an Arduino Uno rev3 and such. This model is for 28 pin through hole chip.
Deluxe Parametric Compartment Box (http://www.thingiverse.com/thing:15802)
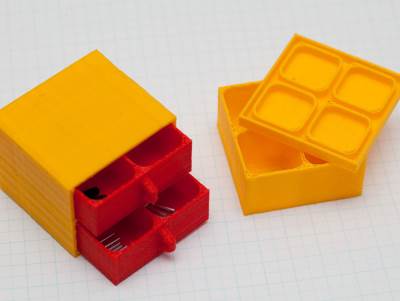
Storage system for storing various things. Developed from the simpler parametric compartment box by adding two new cool features: (optional) rounding of all compartment corners to prevent the pesky nuts and bolts from hiding in the corners to avoid being used, and handles plus some new OpenSCAD modules for creating a cabinet of drawers.
Ball bearing caster (http://www.thingiverse.com/thing:1052674)
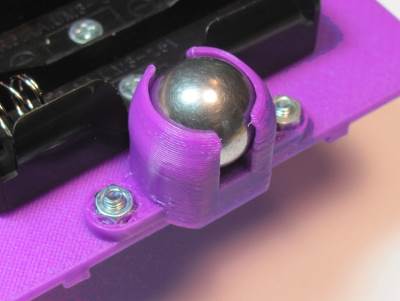
Remix of Marble Caster by HipsterLogic (http://www.thingiverse.com/thing:8959/)
Designed for a 5/8" ball bearing (http://www.mcmaster.com/#96455k58/=z8321g), which operates smoother than the marble.
Full drawing robot project documented at http://www.instructables.com/id/Low-Cost-Arduino-Compatible-Drawing-Robot/
Circuitos ^
Aqui é apresentado um circuito simples que poderá ser construído com componentes.
Botão de Shutdown para Raspberry PI
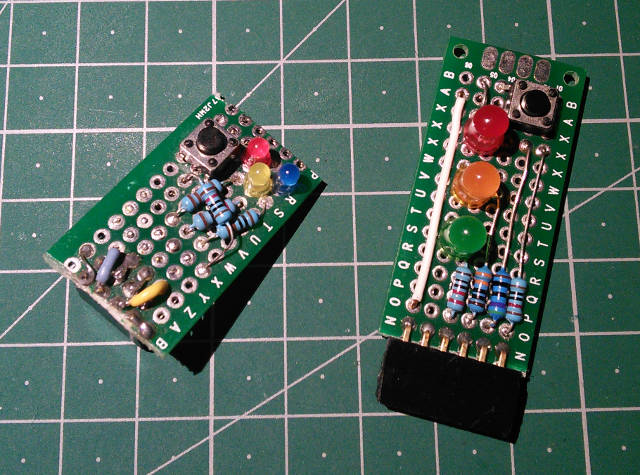
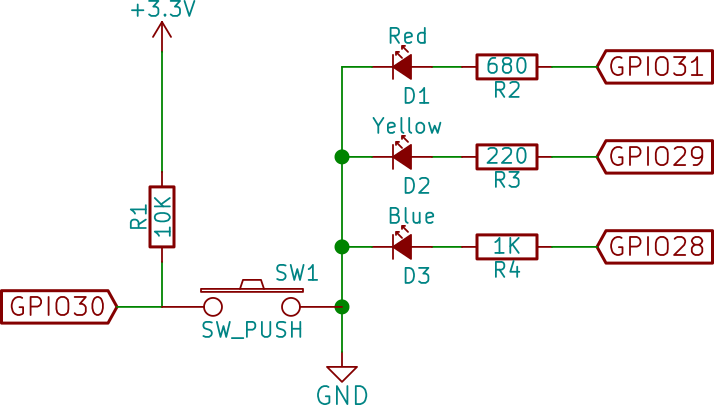
Hoje iremos construir um pequeno circuito que permite executar comandos no Raspberry Pi para fazer o que quisermos quando um botão é premido (no nosso caso para iniciar o processo de shutdown). Este circuito é bastante simples e requer apenas uma resistência e um botão. Foram acrescentados alguns LEDs para o Raspberry PI nos poder dar feedback sem que tenhamos que ter um monitor ou estarmos ligados remotamente.
Esquemático
Componentes (BOM):
Circuito:
- 1x Resistência de 10K Ohms(R1)
- 1x Botão de Pressão (SW1)
- 1x Resistência de 1K Ohms (R4)
- 1x Resistência de 220 Ohms (R3)
- 1x Resistência de 680 Ohms (R2)
- 1x LED Vermelho de 3mm
- 1x LED Azul de 3mm
- 1x LED Amarelo de 3mm
Pin-out dos IC/Componentes
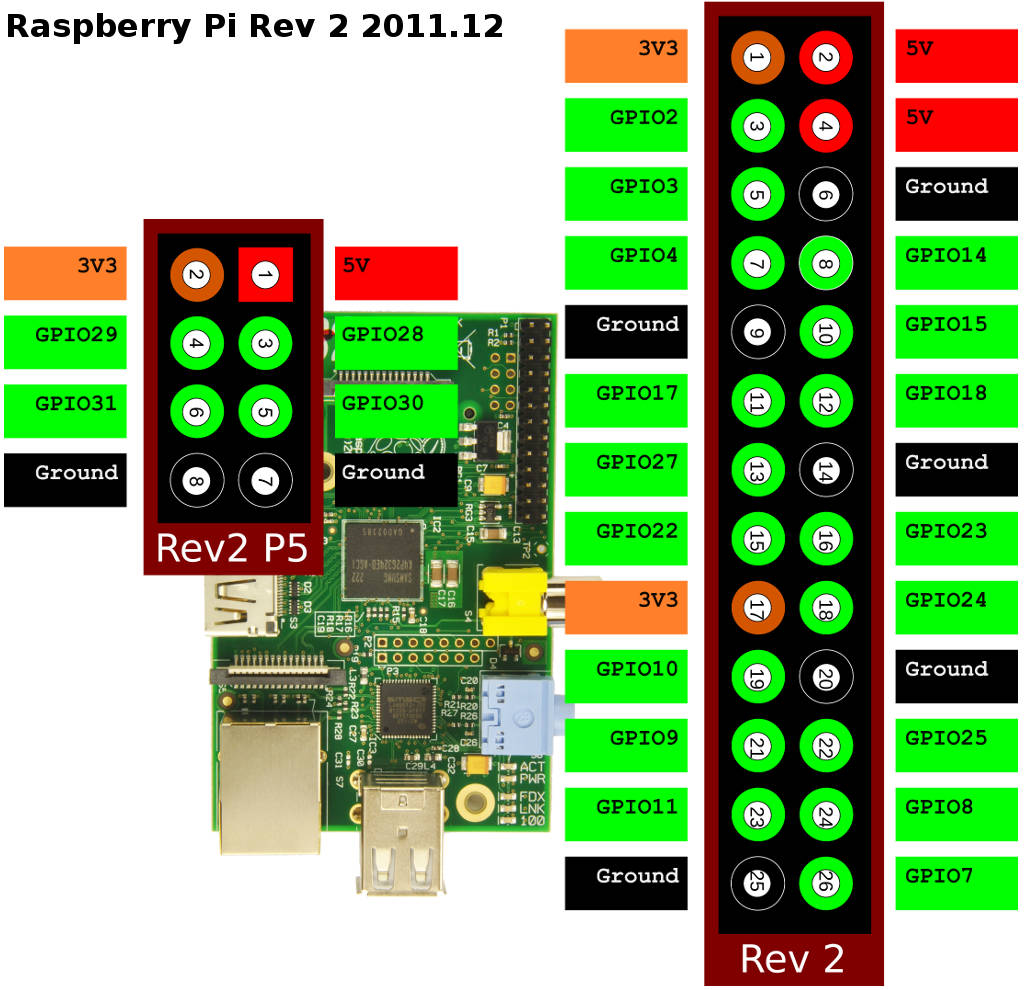
O Pinout do Raspberry PI Model B Rev. 2 é o seguinte:
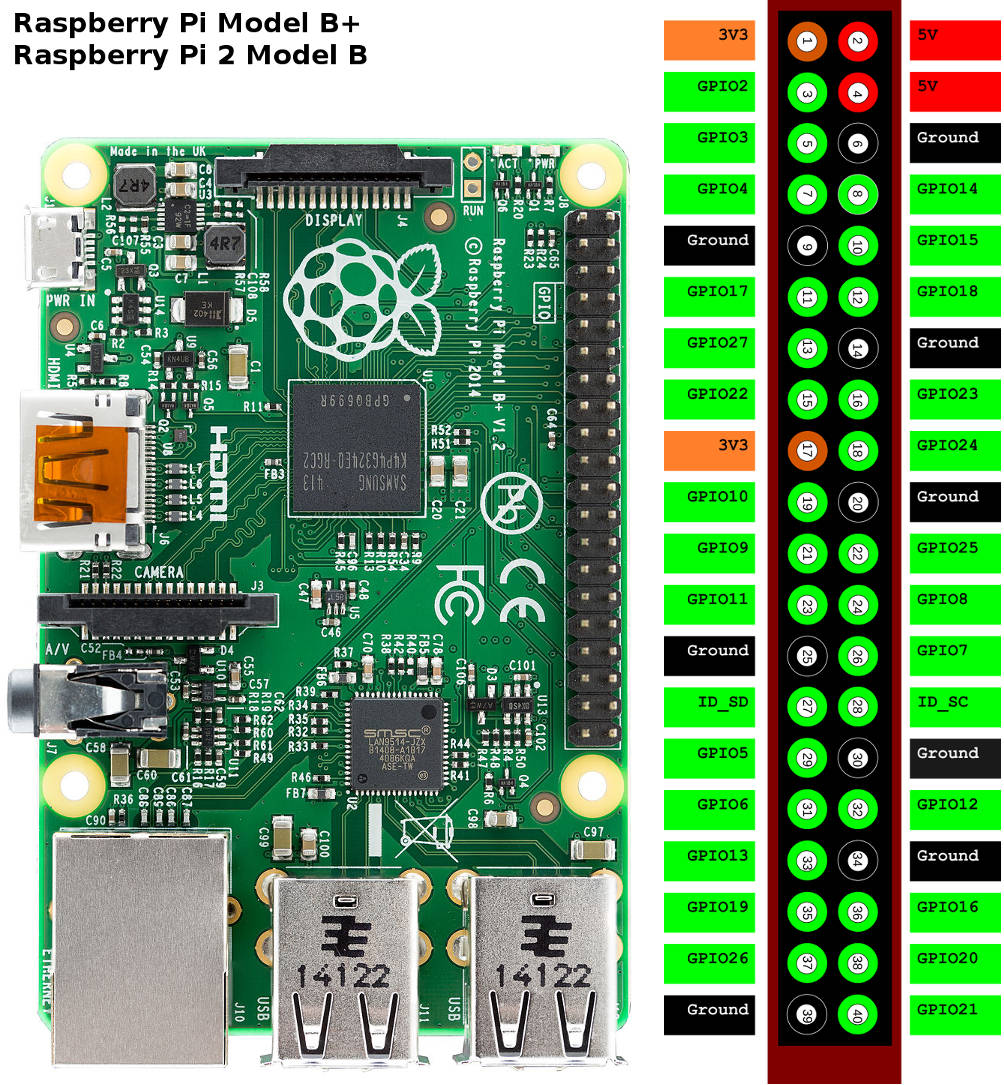
O Pinout do Raspberry PI 2 Model B é o seguinte:
Código
Para o que o circuito funcione teremos que executar o "programa" que dará a instrução de shutdown quando detetar que o botão foi primido.
O sistema usado para se correr o código apresentado foi o raspbian jessie de 2015-09-24 e foi usado um Raspberry PI 2. Pode ser descarregado daqui.
Se quiserem usar um script para testar apenas se o botão e os LEDs estão a funcionar:
#!/usr/bin/python
# -*- coding: utf-8 -*-

import RPi.GPIO as GPIO
import time

buttonPin = 30
bluePin = 28
yellowPin = 29
redPin = 31

GPIO.setmode(GPIO.BCM)
GPIO.setup(buttonPin, GPIO.IN, pull_up_down=GPIO.PUD_UP)
GPIO.setup(bluePin, GPIO.OUT)
GPIO.setup(yellowPin, GPIO.OUT)
GPIO.setup(redPin, GPIO.OUT)


def Button(channel):
    print 'button pressed!'


GPIO.add_event_detect(buttonPin, GPIO.FALLING, callback=Button,
                      bouncetime=2000)
try:
    while 1:
        GPIO.output(bluePin, 1)
        time.sleep(1)
        GPIO.output(bluePin, 0)
        GPIO.output(yellowPin, 1)
        time.sleep(1)
        GPIO.output(yellowPin, 0)
        GPIO.output(redPin, 1)
        time.sleep(1)
        GPIO.output(redPin, 0)
except KeyboardInterrupt:

    # If CTRL+C is pressed, exit cleanly:
    GPIO.cleanup()  # cleanup all GPIO
O programa para fazer o shutdown deve ser criado com o nome "/home/pi/gpioshutdown.py":
#!/usr/bin/python
# -*- coding: utf-8 -*-

import RPi.GPIO as GPIO
import time
import os

buttonPin = 30
bluePin = 28
yellowPin = 29
redPin = 31


def Int_shutdown(channel):

   # shutdown our Raspberry Pi

    GPIO.output(bluePin, 1)
    os.system('sudo shutdown -h now')


GPIO.setmode(GPIO.BCM)
GPIO.setup(buttonPin, GPIO.IN, pull_up_down=GPIO.PUD_UP)
GPIO.setup(bluePin, GPIO.OUT)
GPIO.setup(yellowPin, GPIO.OUT)
GPIO.setup(redPin, GPIO.OUT)

GPIO.add_event_detect(buttonPin, GPIO.FALLING, callback=Int_shutdown,
                      bouncetime=2000)

GPIO.output(yellowPin, 1)
while 1:
    time.sleep(1)
Nota: se este for colocado noutro directório, terá que se ajustar o caminho no passo seguinte.
O script foi parametrizado para usar os seguintes GPIO:
- LED amarelo: 29
- LED vermelho: 31
- LED azul: 28
- Botão: 30
Esta configuração funciona na placa Raspberry PI rev 2 que tem a segunda fila de pinos (header).
Para se usar os pinos do header principal deve ser feita a seguinte alteração:
buttonPin = 17
bluePin = 2
yellowPin = 3
redPin = 4
E estes reflectem os pinos do header principal.
Para finalizar, e para que seja ativado, é necessário editar o ficheiro /etc/rc.local e acrescentar a seguinte linha, antes do exit 0:
python /home/pi/gpioshutdown.py &
Neste momento deverá reiniciar-se o Raspberry Pi.
Links úteis:
- RPi.GPIO - A module to control Raspberry Pi GPIO channels
- How to use interrupts with Python on the Raspberry Pi and RPi.GPIO
Artigo do Maker ^
Projeto interessante publicado por um maker.
RGB Internet Pumpkin
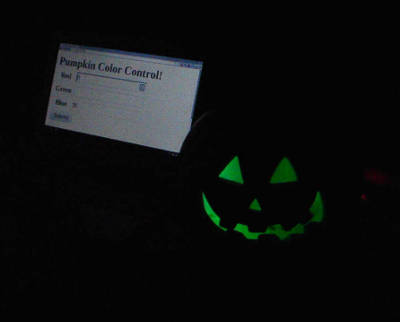
Hoje vamos apresentar um projeto de maker que é um exemplo do que pode ser feito com um pequeno circuito e um raspberry PI nesta epoca do Halloween. Este projeto foi feito pelo Paul Schow e encontra-se na página do seu blog.
Este projeto é uma evolução do seu projeto anterior Raspberry Pi Internet LED Control
O Código encontra-se no Github.
Foi usado um LED RGB de anodo comum.
Circuito
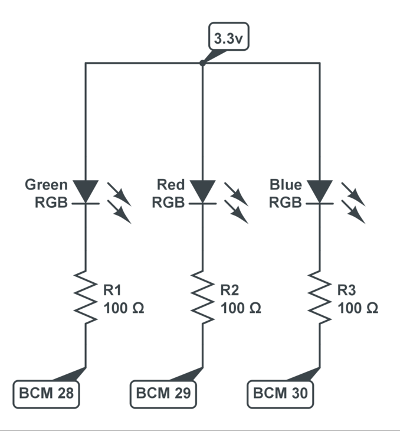
Foram usados os pinos BCM do raspberry Pi com os numeros 28, 29 e 30. As resistências usadas são de 100 ohms cada. Algums guias para ligar os LEDs RGB recomendam 180 ohms para o vermelho, e 100 para o azul e verde. Foi usado o que havia disponivel que era de 100. Funcionou!
Depois de alguns testes, foi possível criar a interface para a web. Inicialmente foi usado o código que já tinha sido usado noutro projeto, no entanto depois foi encontrada a bilbioteca WebPy, e foi possível criar uma solução mais elegante.
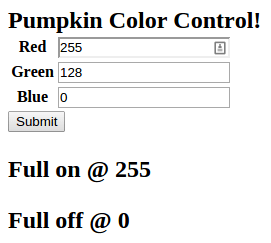
Inicialmente aceitava valores entre 0 e 100 mas para que fosse compativel com os valores RGB habitualmente usados foi alterada para aceitar valores entre 0 e 255.
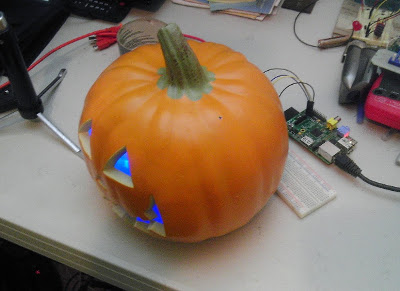
A cor do LED é bastante dificil de perceber mas com a utilização de uma peça que possa difundir a luz os resultados ficam melhores (pode-se usar uma bola de ping pong). No caso do projeto foi usada uma abobora falsa.
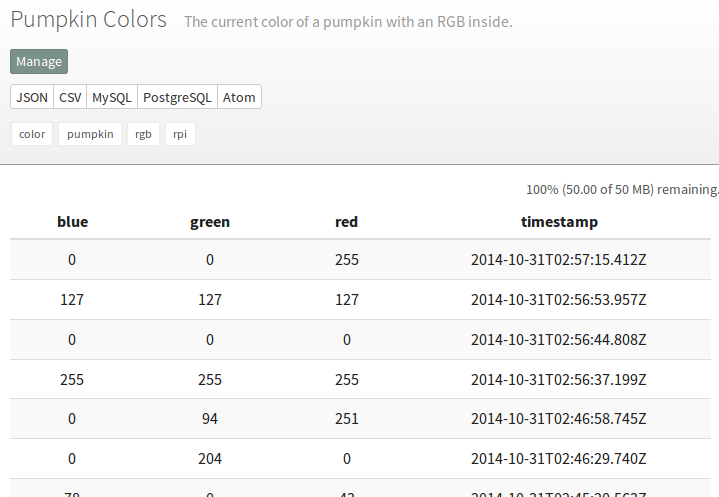
Foi feita uma atualização para que os dados carregados no form pudessem ser enviados via Internet para o serviço data.sparkfun.com.
Foi usado o script phant que se encontra no github para esse efeito.
O resultado foi o seguinte:
Também foram feitas algumas adaptações para que pudesse ser usado o google charts para criar um ficheiro html com um gráfico dos valores usados.
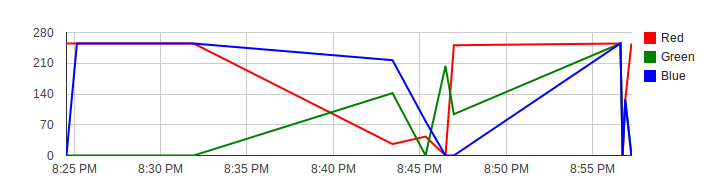
O Código python usado no projeto é o seguinte (encontra-se disponivel no github no link)
#!/usr/bin/env python

# A small python script for controlling a RGB LED
# connected to a raspberry pi
# over the internet

import web
from web import form
import RPi.GPIO as GPIO
import phant

# No GPIO warnings
GPIO.setwarnings(False)

# Use Raspberry Pi bcm numbers
GPIO.setmode(GPIO.BCM)

# Set up GPIO output channels
GPIO.setup(28, GPIO.OUT)  # Green
GPIO.setup(29, GPIO.OUT)  # Red
GPIO.setup(30, GPIO.OUT)  # Blue

# Green LED at pin 28, 60 Hz
G = GPIO.PWM(28, 60)
# Start off
G.start(100)
R = GPIO.PWM(29, 60)
R.start(100)
B = GPIO.PWM(30, 60)
B.start(100)

# Set up phant for data.sparkfun.com
p = phant.Phant('publickey', 'red', 'green', 'blue', private_key='privatekey')

render = web.template.render('templates/')

urls = ('/', 'index')
app = web.application(urls, globals())

# Create form
myform = form.Form(
    form.Textbox("Red",
        form.notnull,
        form.regexp('\d+', 'Must be a digit'),
        form.Validator('Must be more than 0', lambda x: int(x) >= 0),
        form.Validator('Must be less than 255', lambda x: int(x) <= 255)),
    form.Textbox("Green",
        form.notnull,
        form.regexp('\d+', 'Must be a digit'),
        form.Validator('Must be more than 0', lambda x: int(x) >= 0),
        form.Validator('Must be less than 255', lambda x: int(x) <= 255)),
    form.Textbox("Blue",
        form.notnull,
        form.regexp('\d+', 'Must be a digit'),
        form.Validator('Must be more than 0', lambda x: int(x) >= 0),
        form.Validator('Must be less than 255', lambda x: int(x) <= 255)),
    )


class index:
    def GET(self):
        return render.webledpi(myform)

    def POST(self):
        if not myform.validates():
            return render.webledpi(myform)
        else:
            #print form.d.Red
            #print form.d.Green
            #print form.d.Blue

            # Convert intputs to int
            IntRed = int(myform.d.Red)
            IntGreen = int(myform.d.Green)
            IntBlue = int(myform.d.Blue)

            print "Red = %d Blue = %d Green = %d" % (IntRed, IntGreen, IntBlue)

            # Send values to data.sparkfun.com
            p.log( IntRed, IntGreen, IntBlue)

            # Subtract input from 255 to get positive numbers
            R256 = 255 - IntRed
            G256 = 255 - IntGreen
            B256 = 255 - IntBlue
            #print R256
            #print G256
            #print B256

            #print '#%02x%02x%02x' % (IntRed, IntGreen, IntBlue)

            # Divide number by 2.55 to get value out of 100
            # And set the duty cycle of the LED
            R.ChangeDutyCycle(R256 / 2.55)
            G.ChangeDutyCycle(G256 / 2.55)
            B.ChangeDutyCycle(B256 / 2.55)

            return render.webledpi(myform)

if __name__ == "__main__":
    web.internalerror = web.debugerror
    app.run()
Este projeto é avançado e parte do principio que já se têm as bibliotecas necessárias instaladas.
Outros artigos/projetos interessantes de ler
- Enginursday: Doing Away with Delay() in a Different Way
- QC OK 2.7-5.5V DC “FUCK”
- Treasure Hunter - Geiger Counter
- MyPIAmp project - RPI player and amplifier
- Seven Segment Display Thermometer - Arduino Based
- DIY milliohmmeter
- Installing libraries and how to write a library for Arduino
- RealTerm BusPirate Sniff
Compras ^
Artigos do ebay ou de outras lojas online que poderão ser úteis em projetos. A informação aqui presente apenas serve para ajudar na aquisição dos componentes. O altLab não tem qualquer intervenção/participação em qualquer negócio aqui apresentado.
00pcs Red Green Blue 5mm 4 pin RGB Diffused Common Anode LED
(http://www.ebay.co.uk/itm/401015216508) - US $5.34
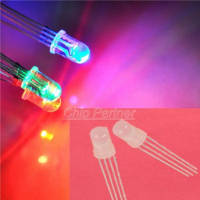
Ultra-Bright 5mm 4 PIN Diffused Common Anode RGB Red/Green/Blue LED
6000-8000 mcd
Size: 5mm
Emitted Colour : Red / Green / Blue
Pins sequence: RED/Common Anode(positive terminal)/Green/Blue
Lens Color : Diffused
Luminous Intensity: 4000/8000/5000mcd
Forward Voltage (V) : 2.1~3.4
View Angle: About 25 degree.
Please test to add current limiting resistor, it will be very easy to burn out the LED resistance of a few hundred to 1000ohm can
- R: wavelength 630-640nm Brightness 1000-1200mcd Voltage 1.8-2.0V
- G: wavelength 515-512nm Brightness 3000-5000mcd Voltage 3.2-3.4V
- B: wavelength 465-475nm Brightness 2000-3000mcd Voltage 3.2-3.4V
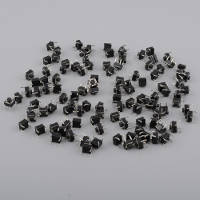
Useful 100PCS Mini 6x6x5mm Through-Hole 4pin Push Button Switch Momentary
(http://www.ebay.co.uk/itm/271659243456) - £0.99
Description:
- 100% New & High Quality.
- Feature momentary contact, 4 pins, round black push button, through hole mounting, 6x6x5mm size, etc.
- Used in the fields of electronic products, household appliances and more.
- High precision mechanism design offers acute operation and long service life.
- Current Rating: 50mA
- Voltage Rating: 2VDC
- Insulating Resistance: >100M ohm 250V DC
- Withstand Voltage: 250V AC in 1 minute
- Contact Resistance: <100m ohm
- Soldering Temperature: 240 deg C Max in 3 seconds
- Mechanical Life: >100,000 Cycles
- Electrical Life: >100,000 Cycles
- Ambient Temperature: -25 deg C ~ +70 deg C
- Ambient Humidity: <85 %RH
- Operating Force: 180 +/- 50 gf
Package includes:
- 100Pcs 6x6x5mm DIP Through-Hole 4Pin Tactile Push Button Switch Momentary
That's all Folks!